
Understanding Vapor Barriers
What is a Vapor Barrier?
A vapor barrier is a crucial component in construction, particularly in crawl spaces and basements, designed to prevent moisture from penetrating through surfaces. Typically made from materials such as polyethylene sheeting, vapor barriers act as shields against moisture, creating a dry environment crucial for preserving structural integrity and preventing mold growth. The installation of effective vapor barriers can significantly enhance the longevity and health of a home.
Why Vapor Barrier Installation is Important
The importance of vapor barrier installation cannot be overstated. Moisture in the home can lead to several issues, including mold growth, which poses health risks to occupants, and structure damage, leading to costly repairs. By ensuring a comprehensive Vapor Barrier Installation, homeowners can protect their properties from these risks, maintain air quality, and enhance energy efficiency. Furthermore, it helps in regulating humidity levels, which is vital for comfort within the living space.
Common Materials Used
Various materials are employed when installing vapor barriers, each with distinct advantages. Polyethylene sheeting is the most common choice, often available in different thicknesses. Thicker varieties are generally more durable and effective at moisture prevention. In addition to polyethylene, foil-faced barriers can be employed in certain scenarios, particularly where reflective properties are beneficial. Understanding the specific needs of your property will help in selecting the appropriate material.
Preparing for Vapor Barrier Installation
Assessing Your Crawl Space
Before beginning the vapor barrier installation, it’s crucial to assess the crawl space thoroughly. Look for existing moisture issues, signs of mold, and structural concerns such as cracks in the foundation. Evaluating these aspects will determine the best approach and materials needed for installation. It is advisable to measure the area accurately to estimate material requirements and ensure a proper fit.
Gathering Necessary Tools
Gathering the right tools before starting the installation process is essential for efficiency and effectiveness. Fundamental tools required include scissors or a utility knife for cutting the vapor barrier material, a measuring tape, a staple gun or adhesive for securing the barrier, and safety equipment such as gloves and a mask. Additional tools might include a moisture meter for checking baseline humidity levels.
Choosing the Right Materials
Choosing the right materials extends beyond just the vapor barrier itself. Consider the foundation type and existing moisture levels when selecting additional components, which may include sealants, adhesives, or insulation. Always opt for high-quality materials that promise durability and reliability, as these will directly impact the effectiveness of your moisture prevention strategy.
Step-by-Step Process for Vapor Barrier Installation
Cleaning and Preparing the Area
Begin the installation by thoroughly cleaning the crawl space area. Remove any debris, dirt, or old materials that may hinder the barrier’s performance. This may involve using brooms, vacuums, or even pressure washers for tougher grime. After cleaning, inspect the area for leaks or standing water that may require remediation before proceeding with the installation.
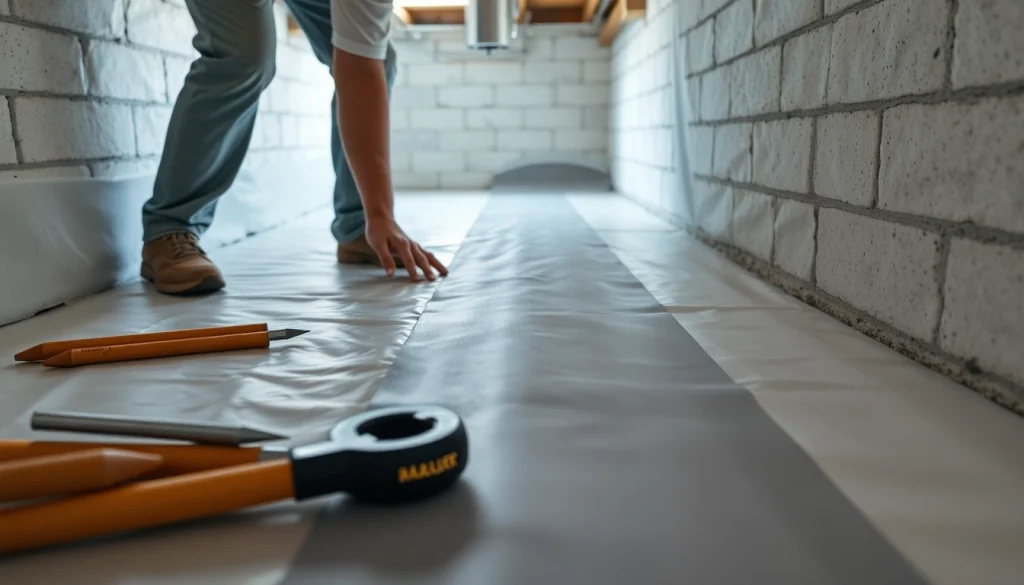
Installing the Vapor Barrier
Once the area is prepared, it is time to install the vapor barrier. Start by rolling out the polyethylene sheeting across the crawl space floor, ensuring that it extends up the walls by a minimum of 12 inches. Overlap seams by at least 12 inches and secure them with polyethylene tape. Use a staple gun to attach the upper edge of the barrier to the walls, ensuring a tight fit that will prevent moisture entry.
Sealing and Finishing Touches
After the vapor barrier is installed, seal all seams with tape to prevent moisture from slipping through the gaps. Inspect the entire surface for any potential entry points and seal them using silicone or an appropriate sealant. Finally, perform a walk-through to ensure that there are no sections left unsecured, and make necessary adjustments to ensure complete coverage.
Maintaining Your Vapor Barrier
Routine Inspections
Routine inspections are vital for maintaining the integrity of your vapor barrier. It is recommended to inspect at least once a year and immediately following heavy rainfall events. Look for any signs of wear, tears, or shifts in the vapor barrier that could compromise its moisture-blocking capabilities. Regular check-ups will help catch issues early and mitigate possible damage.
Signs of Damage
Recognizing signs of damage is crucial for timely repairs. Common indicators include visible mold growth, an earthy odor from the crawl space, or increased humidity levels measured via a hygrometer. Discolored or sagging sections of the vapor barrier may also signal deterioration. Immediate action should be taken if any of these symptoms are observed.
Repair and Replacement Tips
If you find damage during inspections, address it promptly to avoid more extensive repairs later. Small tears can often be patched with tape or sealant, while larger affected areas may require sections of the barrier to be replaced entirely. When replacing, ensure that new materials are consistent with the existing vapor barrier to maintain effectiveness. If in doubt, consulting a professional for guidance may be beneficial.
Frequently Asked Questions
What is a vapor barrier?
A vapor barrier is a material designed to stop moisture from seeping through surfaces, essential for controlling humidity levels under homes.
Why is vapor barrier installation important?
Proper vapor barrier installation safeguards your home against moisture damage, mold growth, and structural issues, securing a healthy environment.
How often should I inspect my vapor barrier?
Inspect your vapor barrier at least once a year and after heavy rainfall to ensure it remains effective in moisture control.
Can I install a vapor barrier myself?
Yes, with the right tools and guidelines, many homeowners can install a vapor barrier. However, professional help is advisable for complex installations.
What materials are best for vapor barriers?
Polyethylene sheeting is the preferred material as it effectively blocks moisture. Thicker options typically provide increased durability and efficacy.